Taylor Dushkin, Operations Manager
Hunter Family Orthodontics in Woodlands, Texas
Our staff used to experience significant stress between the rushed gap of debonding patients and getting their retainers made and delivered before the teeth moved. We decided to try digital bracket removal so we could order the retainers before debonding, and have them ready on debond day. There were some learnings to ensure successful retainer fit, but it’s made a huge difference in our workflow. Now our debond sequence includes a scan four weeks prior to the actual debond appointment; this gives us plenty of time to have retainers ready without worrying about relapse.
The uDesign® software puts the tools in our hands, so we can do this ourselves. If you do not want to use the tools, or don’t have the time, you can always have the uAssist™ team do the bracket removal for you.
10 Steps to ensuring successful retainer fits at debond
- Choose good candidates without puffy gums: (especially when starting out). Make sure the patient has reasonable hygiene. If the gums are too puffy and cover too much of the tooth structure, you will have fit issues. Patients with bands around the 6’s, springs, expanders, TPAs, holding arch, etc. are also not good candidates.
- Prep the patient for the scan by removing the wire and any power chains, then brush, floss and open and close any doors, if using self-ligating brackets.
- Use best practices for scanning including blowing air during the entire scan to minimize bubbles and other artifacts. This is critical. The person scanning should understand how this scan will be used so they know how important capturing an accurate scan is to the efficiency of the process – Organize a joint session between team members when starting out.
- Upload the scan into uDesign—select “retainer” to save the treatment planning steps. If you are planning an active retainer, see step 6.
- One-touch Bracket removal tool: Select the bracket removal tool and remove all. I like to select “undo” to verify that the AI identified all the bracket material and only bracket material. Once you are proficient, this process should only take about 5 minutes.
- Active Retainers for final movements: If you want to create an “active” retainer to make final detail movements or tighten up spaces, choose “aligner” so that you can use the tools to add a virtual c-chain, etc.
- Add fill: If you are printing in office, you can add some resin fill before thermoforming. If you wish to add digital fill there are four ways to do this:
- Place a dead wire (no adjustment) to be worn until the debond and retainer delivery appointment.
- Make or Order Retainers:
- Debond and Deliver Retainers: Four weeks later at the debond appointment, remove the braces, take final records and the patient can leave with their retainers!
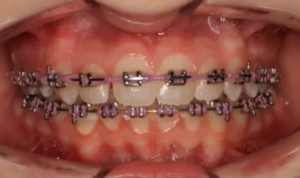 | 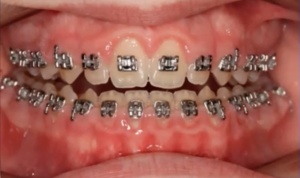 |
| Good Candidate | Poor Hygiene/Bad Candidate |
a. In the raw STL scan before segmentation (model correction)
b. In the treatment planning screen
c. In the checkout screen (ask the manufacturing team to add fill)
d. Ask the uAssist team to do this for you
a. If you are making retainers in-office, ensure that your thermoforming machine is perfectly calibrated to the right temperature and pressure. Improper calibration can lead to fit failure.
b. If you are ordering from uLab®, you can choose to purchase a la carte or as a retainer bundle. Don’t forget to setup your artwork so you can order in custom packaging! Promote your practice every time a patient removes their aligners!
Ready to get started? Contact your regional sales manager or clinical trainer, they’re happy to help!